


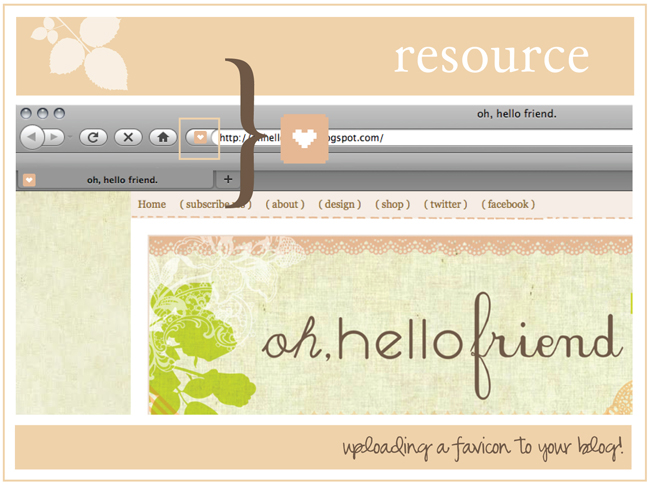
Today I am going over how to add a favicon in blogger, for those blogger.com users :) If you don't use blogger, these seem pretty helpful: adding favicon in wordpress or favicon for your website.
There are a couple ways to get your favicon in blogger, but this is the easiest way I've found. Usually you deal with a .ico file. The only issue with .ico is that free uploading sites like flickr or photobucket do not regonize an .ico file and therefore, you can't upload it. Thanks to blogger buster.com, there is a way you can create a favicon using a .png file. So I am showing you how based off his steps.. Click below for the tutorial!
( note: the icon will only appear in firefox )
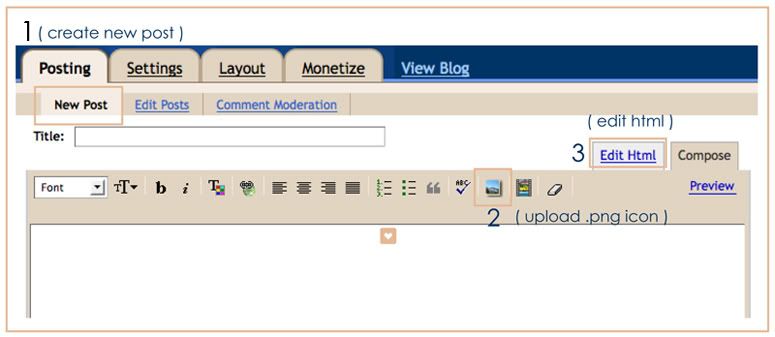
1) Create your favicon image. If you have photoshop or illustrator, you can create your favicon by creating a 16x16 pixel document. Remember, it's super tiny so it is probably best to use some sort of icon or shape. Obviously, no lines of text. If you don't have photoshop to create your own favicon, you can use this free favicon image editor and either upload a photo or color one in if you know how to work with pixels and squares ;) If you don't want to create your own, here are some free favicon's you can download from other sites:

121 Bitcon Icons from somerandomdude.com


140 Mini Icons from famfamfam.com

247 flag icons from famfamfam.com

31 pixelicons from explodingboy.com
2. You need to get the format of your icon to a .png format. Use photoshop and "Save as" to create a .png file. If you don't have photoshop, simply go to the free online image converter and upload your icon. Then click the link below that says "Convert to PNG" and the file will download to your computer.
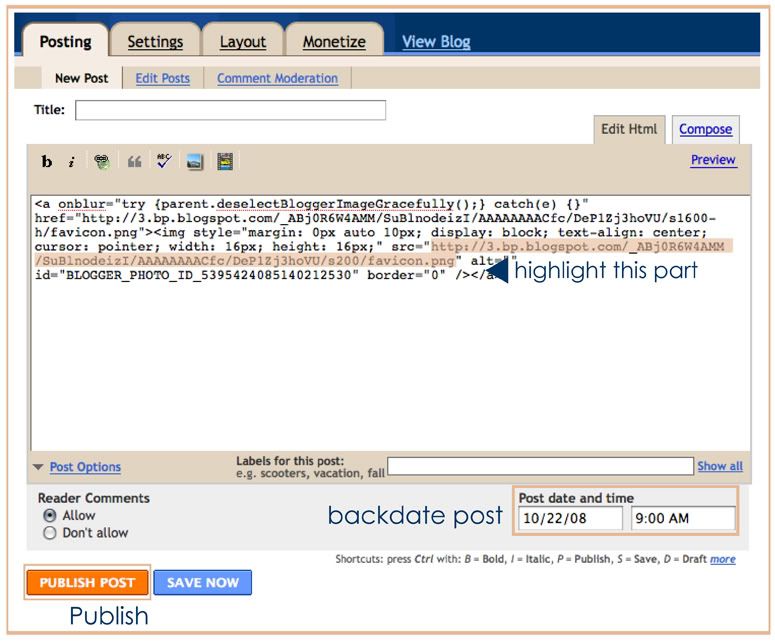

<link href='http://your-icon-url.png' rel='shortcut icon'/>

<link href='http://your-icon-url.png' rel='icon'/>
The blue URL text is the text you need to replace with the URL text you copied from step 4. I placed it in the part where I highlighted in the image. Just make sure it is between the &head> and < /head> tags. Click "Save Template" and see your new favicon loaded! :)
if you made it all the way through (hope it wasn't confusing!)
please comment with your blog link so i can see your lovely favicon ;)
and of course, comment if you have any questions or
get stuck and i'll try to help. have fun!
xo.
please comment with your blog link so i can see your lovely favicon ;)
and of course, comment if you have any questions or
get stuck and i'll try to help. have fun!
xo.


love your tutorials - thank you so much for creating them!!
ReplyDeleteOh my goodness! It's so ironic that you posted this today... I was just working on one for my website I'm trying to develop! I didn't realize you could do it for a blog too though... that's wildly awesome!
ReplyDeleteThanks so much! I'm going to send this to all my friends!
Thank you so much for sharing this! I can't wait to try it!
ReplyDeletevery helpful info :)
ReplyDeleteI know I just commented, but I just wanted to say that I just finished going through the tutorial (it took me what... 20 minutes?), and it was so easy! AND I feel like I accomplished something really cool!
ReplyDeleteFor me, the blogger favicons only show up when I'm using Firefox (they show up with the default blogger icon when I use Safari).
So exciting.
Anyway,
www.quailcreative.blogspot.com
Thanks again!
Thank you so much! How my favicon looks like? http://www.elositoconzapatosnuevos.com/
ReplyDeletethank you so much for this tutorial! However I am having problems with the last step with putting the code into the html blogger layout. :(
ReplyDeleteNo matter where I insert into the template code, the icon doesn't show up. Help anyone?
done & done! so easy! Thank you...
ReplyDeleteckoberdesigns.blogspot.com
(it's not showing up on my firefox, but is on my safari...weird)
you're awesome. i just did this and i love it. thank you!
ReplyDeleteThanks for the tuturoial I tried it and it worked! Although it only shows up on Firefox. Internet Explorer defaults to their ugly "e" symbol. But at least Firefox displays it nicely :)
ReplyDeleteOh! This comes out so helpful! I wanted to do this for some time but didn't have a clue how to do it or what keywords to use to search for it... Thanks a lot! I am going to do it now ;O)
ReplyDeleteThanks, Danni!
ReplyDeleteI have tried it but can't tell if it works because it doesn't show on my Safari... Can anyone see it:
www.loddelina.com
I really really really want one of these!!
ReplyDeleteThanks so so so so much for posting this, I really want one of these badly. Your resources are always so helpful!
ReplyDeleteHope all is well,
Micaela
Very awesome!! Thanks for posting this. I'm glad Rachel noted that it only works for her in firefox. I thought I wasn't doing it right because I normally use Chrome. But when I opened my blog in firefox then it came up! It's all good! Thanks again!
ReplyDeletethis is so handy + good of you to put together!
ReplyDeleteThank you very much for the great tutorial. I already had set the icon on my site but haven't thought about customizing my Blogger site. Now all set. Thank you!
ReplyDeleteYoko
this was so helpful! bookmarked! thank you!
ReplyDeleteThanks Danni! I managed to get it to work:
ReplyDeletehttp://dear-evie.blogspot.com/
but had to adjust where to place the code a little... won't let me paste the info in comments though. :'(
I tried out the tutorial, but can't see the icon.
ReplyDeleteI tried both Firefox and Safari, but can't see my icon. Why?
THANK YOU!!! THANK YOU!!!
ReplyDeleteI've been scouring the Web trying to find a good resource for uploading favicons - I want to get some good heart icons. I really appreciate this post!
xoxo
hi everyone! saw some really lovely icons!
ReplyDeleteit seems some people might have to paste the code in other places too. if it's not working for you, try find the < /head> code in the html and paste the links RIGHT BEFORE the < /head> code :)
if you need help, feel free to email. i'm no html expert but i'll do my best to help!
xo.
THANK YOU! I did a post all about me and my inability to follow your simple and perfect directions. Thanks for replying to my email so quickly. The green grass looks GREAT! Have a happy favicon Friday.
ReplyDeleteCheers
Hello, again,
ReplyDeletethanks for your reply, Danni - I will look into it and install firefox.
I love following your blog, so many beautiful finds and tips!
Thanks for the tutorial. But I'm having trouble with the last step. When I try and putting it in it doesn't want to work!!
ReplyDeleteThanks for the tutorial Danni. I followed all your steps and created one. I think it worked. I just don't have firefox so i don't know. haha! I really enjoy your lovely blog. Thanks for blogging!
ReplyDeleteThanks for offering your help via e-mail, but you can just ignore it now, since I found another tutorial for this:
ReplyDeletehttp://www.bloggerplugins.org/2007/07/another-blogger-trick-change-favicon.html#more
I couldn't get it to work your way but this other tutorial was a bit more simple and I guess uses a shorter code? Or maybe it's just better for blogger templates?
Thanks though!
That's awesome. I am definitely going to try this!
ReplyDeleteIt's so thoughtful of you to share your expertise. The tutorial was easy to follow and worked great. Thank you.
ReplyDeleteMeanwhileinHershey.com
Thank you! It worked. To Jocelyn, try pasting the code right before < /head> tag. I had a similar problem but found it worked if I put it there.
ReplyDeleteThanks so much for the tips!!
ReplyDeleteI thought this would be totally beyond me, but i did it! Thank you! I made a diana camera favicon woo.
ReplyDeletehttp://thatkate.blogspot.com/
great, thank you! I made a red button favicon for my blog. :)
ReplyDeletei had to try one of the codes that someone else posted, but here is my blog:
ReplyDeletehttp://skc-pinkgrapefruit.blogspot.com
just today I was asking my friend how to do this and she had no idea!! Now we know! :D
Thanks so much!
Hei!
ReplyDeleteI just discovered your blog' from pure coincidence and wanted to thank you for helping me put the favicon, a tiny cute thing on my dreamland:)!
I know you hear each day this, but your land here is so beautiful and dreamy, exactly my type!
If you want, you can check out my favicon too, since you've said that up there.
Have a nice peaceful day!
Dearest,
A Dreamer.
hey :) just want to say thank you for sharing this tutorial! i now have an official favicon for my blog :) thanks to you.
ReplyDeleteand i linked you as well. hope you don't mind :)
Thank you so much! It wasn't working out for me at first, but then I saw your comment here and put the code right before the /head and it worked! My blog looks so cool now!
ReplyDeleteCheers from Brazil :D
I just tried this out as I've been wanting a personalised flavicon for ages and all the other tutorials seemed way too hassley.
ReplyDeleteI think it's worked as the blogger symbol has been replaced by internet explorer's logo. Can anyone with firefox etc see my new flavicon to tell me its worked?
http://pretty-green-blog.blogspot.com/
blegghhh
ReplyDeleteof course it doesn't work when i try.
i am an hopeless case when it comes to computers.
:(
Who rocks?
ReplyDeleteThank you! I have been trying to do that forever!
♥ Tiffany Patterson
thank you danni!
ReplyDeletehere is mine :)
http://designandbreakfast.blogspot.com/
Awesome!!! Thanks!!
ReplyDeleteThanks for this tutorial! I tried it and it works!
ReplyDeleterhiannaclaire.blogspot.com