Here's another DIY project from our sweet friend, Sasha - from the The Gilded Bee. Be sure to check out her awesome shop full of handmade packaging lovelies. Thanks for being here with us Sasha!
. . . . . . . . . . . . . . . . . . . . . . . . . . . . . . . . . . . . . . . .
hello, this is Sasha from The Gilded Bee. :)
I'm delighted to share my book tutorial with you today:
HOW TO MAKE THE MINI JOTTER+BOOK:
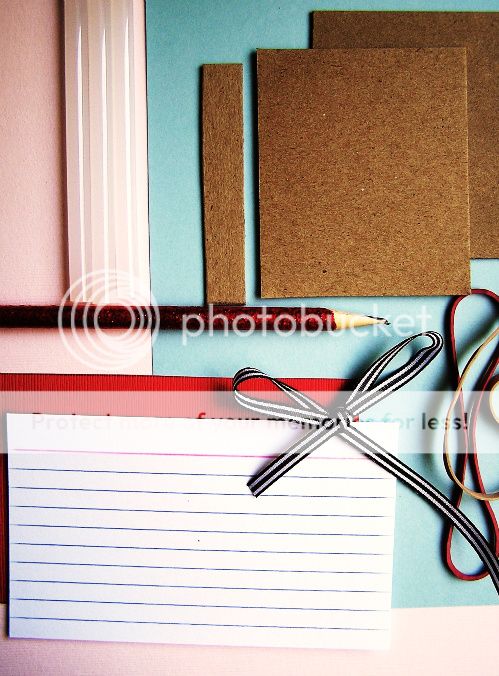
Supplies you’ll need to make this project:
• One—8.5 x 5.5 sheet of cardstock
• One---1/2 x 3 inch piece of cardstock or paper
• Two---2 5/8 x 3 1/8 inch pieces of cardboard, chipboard or matboard (not corrugated)
• Hot glue gun and glue sticks
• 25---3 x 5 inch ruled or blank index cards
• Two---3 x 5 inch sheets cardstock
• 2 rubber bands
• Pencil
• ¼ inch wide Ribbon: One-6 inch piece, plus two-1 inch pieces
To make the page block:
* 1. Fold the 25 index cards, and the two 3x5 sheets of cardstock in half.
* 2. With all of the folded edges facing the same direction, align the pages (this is important, if they aren’t perfectly aligned, some of the pages might not be glued properly/could fall out), and secure with a couple of rubber bands along the edges opposite to the folds.
* 3. With your hot glue gun, apply a layer of glue all over the end of the side with the folded edges (notes: pinch the paper together as you apply the glue to make sure it is the same width all along the finished edge. Use the tip of the glue gun held at an angle to help you spread the glue evenly. When applying the glue, start from the middle, and work your way up and down to each end, be sure to use enough glue, so that all of the pages stick together. This step insures that all of your pages stick together and that they will not shift around when you adhere the cardboard spine)
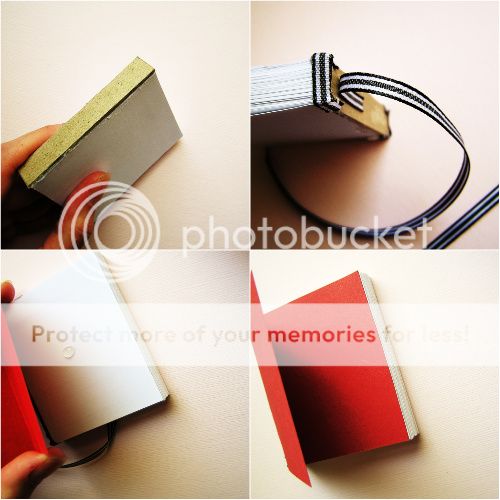
* 4. Apply a bead of glue down the center of the 1/2 x 3" cardstock or paper “spine”, adhere to the fold edge of the page block.
* 5. Center and glue a 1” piece of ribbon to each end of the spine, glue to overlap the edge of spine. Glue one end of the 6” piece of ribbon to the center of one end of the spine (this will be the bookmark).
* 6. Apply a dot of glue to the center of the front page of the page block. Align and adhere the folded 3x5 sheet of cardstock. Then go around under the three non-folded edges of the paper, applying a bead of glue and smoothing as you go along. Repeat on the back of the block.
To make the cover:
* 1. On your 8.5 x 5.5 inch sheet of make the following lines:
Make a little mark at the center of each side of your paper (4.25 inches on center).
On each side of those center marks, draw three lines paralleling each other (6 lines total):
5/16”, 5/8”, 13/16” inch from the center mark.
On each of the lines 13/16” away from the center mark, make a perpendicular mark on the center of that line facing away from the line.
* 2. fold along the lines, pinch to form little pleats.
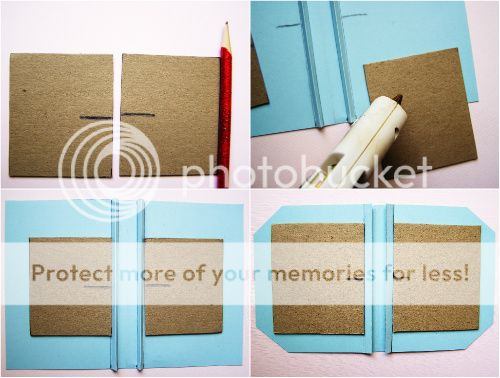
* 3. Make a pencil mark, 1 9/16” on center, on one side of each of your (2 5/8 x 3 1/8”) cardboard pieces.
* 4. On the unmarked side of the cardboard pieces, apply a dot of glue to each of the four corners.
* 5. Flip over and adhere, using the marks that you made to align the cardboard.
* 6. Trim cardstock to approx. 5/8” all around the edge of the cardboard. At an angle, trim the corners, leaving a margin of approx. 3/8”.
* 8. Crease the ridges that you made in step 2. so that they face away from the center, and overlap the cardboard.
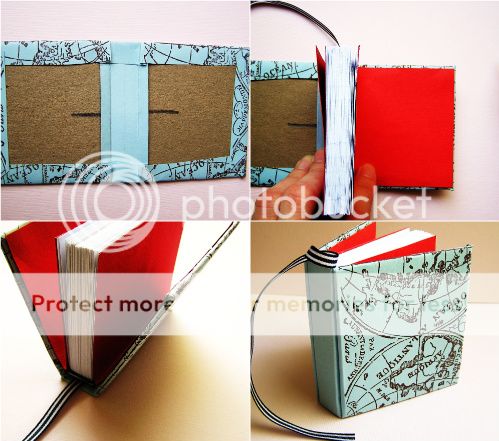
Fold, crease, and adhere the cardstock around the margin of the covers to the cardboard.
* 9. Use the technique that you used in step 6 of making the page block to adhere the inside cover (the red cardstock) to the inside of the back of the cover.
You’ll have a 1/16 margin all around the edge of the lining of the cover.
* 10. Repeat step 9, to adhere the front lining/page to the other side of the cover.
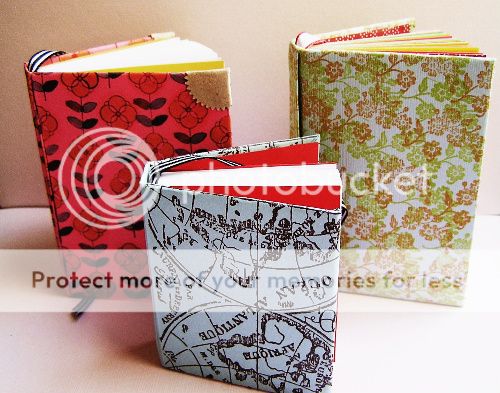
* 11. voila! You have a lovely custom book for jotting your dreams and schemes.
Lovely options:
* You could use colored or patterned papers and cardstock for the pages.
* Add multiple bookmarks. You could add beads or tassels at the ends of your bookmarks.
* Make the book smaller or larger.
* Add a label, bookplate, clip art, or illustrations.
* Add corners to the covers.








This is wonderful!
ReplyDeleteI'm really liking these guest posts. What a beautifully photographed and concise tutorial!
ReplyDeleteThis will be exciting to try, thank you!
This is seriously cool! I might just try and make one :) Thanks!
ReplyDeletegood work!
ReplyDeleteIt is fun too, I´ve tried it:)
I have wanted to make my own notebooks for ages. Thank you so much for sharing this!
ReplyDeleteWell done! Thanks for sharing the details, I have made jotter's through stab binding in the past, but look forward to trying it your way!
ReplyDeleteThis is such a great tutorial. Wish I was on my laptop at home to bookmark it. Have to remember to do that later, I'd love to try this!!
ReplyDeleteWhat a great idea! Love it:-)
ReplyDeleteSo cute! And I think I could do this! I am not crafty at all but I think this may be doable.
ReplyDeleteКак говорилось на Seexi.net Девочки, в случае в случае если кто обращался к трихологу и знает неплохого профессионала в Москве, посоветуйте, плиз!! Замучила перхоть, точнее себорея. Все бабушкины средства и все аптечные шампуни (Себазол, Фридерм-Деготь и пр.) НЕ ПОМОГАЮТ!!! Дерматолог также особо не несомненно несомненно помог!
ReplyDeleteI've always wanted to make these. GREAT TUTORIAL!
ReplyDeleteI need to give it a shot.
beholdthemetatron.com
Wonderful! Thanks! I can't wait to try it.
ReplyDeleteI can't wait to give this a shot! Having the step by step tutorial makes it seem much more possible! Thank you for giving me the courage to give this project a try!
ReplyDeleteP.S. I am loving these guest posts!
Thank you!
xo
Caroline
sundayevening.net
mmkay I love this .. WOW
ReplyDeleteHello people, neat site I find It incredibly useful and it's helped me loads
ReplyDeleteI hope to contribute and guide other people like this chat board has helped me
_________________
[URL=http://electricalhelper.co.uk/electrical-help/install_a_consumer_unit.htm]consumer unit[/URL]
Thanks for the great lesson. It's easy to understand and I can make my own and also make some winter gifts for friends...Really appreciated!!
ReplyDeletextfheyomfjlcheonsanh, http://yahooscanner.net yahoo scanner, AfocjzH.
ReplyDeleteAwesome! I think I could actually do this! Maybe I actually will...!
ReplyDeleteBook binding = SUPER FUN! More binding tutorials for the holidays are requested! Thanks for the great post!
ReplyDeleteLove this post, those mini notebooks are very cute. I'd love to make myself a bigger version (I have massive handwriting).
ReplyDeleteoh my goodness, so cute! and so many possibilities!
ReplyDeleteOh my gosh those are so, so cute! I would love to link to them if you didn't mind.
ReplyDeleteThis is such an awesome tutorial! I have been having a hard time finding the perfect "carry along" journal to keep in my purse and thanks to you, I've now found it!
ReplyDeleteThank you so much for sharing!
Blessings,
Anita ♥
http://aseknc.blogspot.com/
http://asesaj.blogspot.com/
aseknc(at)gmail(dot)com
Whoa! How neat! This would be the perfect addition to a little care package.
ReplyDeleteThat is such a sweet idea:) I love it:)
ReplyDeletehave a great day
hello handmade christmas gifts! definitely bookmarking this!
ReplyDeleteTotal Happiness!!!!
ReplyDeleteI know this was posted awhile back, but I just made it and wanted to make a note. As I was sorting through my craft box I found some very cute fabric scraps, but decided to follow suit and use paper. I don't know if I just pulled/glued too tightly but there were some small tears in the edges/spine of the "cover" so next time (there will be a next time!) I will be using fabric instead of paper! Which I think will be excellent!
ReplyDeleteWOW! Can't wait to try this out :-)!
ReplyDeleteNice! thank you!
ReplyDeleteI loved that!
ReplyDeleteThank you for sharing it!
How cute! What perfect little gifts. I know a few friends who would really appreciate such a sweet handmade gift.
ReplyDeleteThat is a simple & sweet idea! :D
ReplyDeleteMy pages keep falling out. :(
ReplyDeleteI made one of these today :D Great tutorial, I love it!
ReplyDeleteThis is such a wonderful idea. I love that you can decide on the color of paper you want for the inside and personalize the outside of the book. My only concern would be the paper staying in and how fragile it would be. Any suggestions so I would be able to make this for a possibly? It would be great to design it with personal pictures on the front cover too!
ReplyDeleteWhat a wonderful project! I always admire lovely little books like those in the store, so it is great to learn how to make them.
ReplyDeleteBy the way, for those of you using a glue gun for the first time, it is important to keep safety in mind. You might want to consider wearing safety glasses and gloves to prevent against burns. This is particularly true if it is your first time working with a glue gun. Also never leave the glue gun plugged in and unattended!
Has anyone made these with regular paper instead of index cards? I think I'd like the paper to be a little thinner. Thanks for the tutorial! Can't wait to give it a try!
ReplyDeleteLovely tutorial, I will be trying this soon:)
ReplyDeleteWhat a cool tutorial!
ReplyDeleteYou make it look so easy! I'm sure it probably is the second or third time through. I'm going to give it a go anyway, love the idea of handmade books as gifts. I can never have too many journals.
ReplyDeleteOh my gosh! This is so cute. I am in such a DIY mode right now. I have posted a ton of DIY stuff on my blog. Take a peek borntobeblonde.com!
ReplyDeleteGreat idea..I'll surely try it. Thanks for sharing!
ReplyDeleteThis tutorial is awesome! I just made a little book of your designing for my mom and mother in law for mother's day using my little guy's artwork for the cardstock...it is so lovely, I can't wait to share it with them! We used http://www.playcreateexplore.com/2011/09/shaving-cream-marbled-paper.html website to create this marble paper and it is wonderful. Thanks again, there will be happy grandmas this mother's day.
ReplyDeleteThank you so much for this tutorial! I really appreciate the step by step pictures and instructions. I've already made several little notebooks and everyone who sees them likes them! I even tweaked it a little and made a bigger one with 4x6 index cards. Lots of fun! :)
ReplyDeleteI am trying to use 4x6 index cards. Would anyone be so kind as to post the measurements for the cover instructions(size of the sheet, where to draw the lines and marks etc)?
ReplyDeleteLoving the one with rainbow coloured pages - sharing the tutorial with my readers on facebook:
ReplyDeletehttp://www.facebook.com/pages/Partycraft-Secrets/239045209469228
helloo im really interested in trying it out, what kind of hot glue gun did you use, I'm looking to buy one , but I don't know if for doing crafts in general or book biding whats better, if the thin one of 20 watts or the thick one that's 60watts. don't really know which one is better. :)
ReplyDeleteOh they're so cute!!!!
ReplyDeleteDefinitely try to make it one!
They're so cute!!!
ReplyDeleteDefinitely try to make it one!
I'm in the middle of a giant "destashing" project. This'll be a great way to use up all those index cards I have from my teaching supplies. Thanks!
ReplyDeleteNice job of explaining the process and the photos were great. thanks
ReplyDeletebrilliant post !!! i loved your post very much !! keep updating good work ... Thank you !! http://www.flicklawfirm.com/
ReplyDelete